주소창에 http://.../list?path=d:\root 와 같이 path를 자신의 local pc의 dir로 지정하면 파일의 리스트를 출력..

사용자 삽입 이미지
해당 파일명의 링크를 클릭하면 파일이 전송됨..
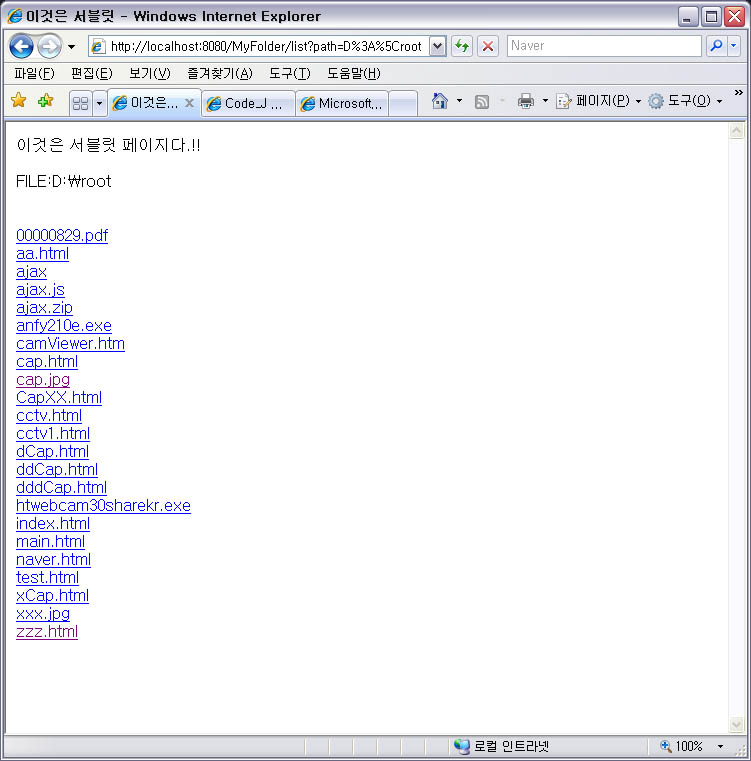
디렉토리는 해당 디렉토리 내부로 이동..


파일 전송을 위한 서블릿 파일
--------------------------------
import java.io.IOException;
import javax.servlet.ServletException;
import javax.servlet.http.HttpServletRequest;
import javax.servlet.http.HttpServletResponse;
import java.net.*;
import java.io.*;

/**
 * Servlet implementation class for Servlet: sender
 *
 */
public class sender extends javax.servlet.http.HttpServlet implements
  javax.servlet.Servlet {
 static final long serialVersionUID = 1L;

 /*
  * (non-Java-doc)
  *
  * @see javax.servlet.http.HttpServlet#HttpServlet()
  */
 public sender() {
  super();
 }

 /*
  * (non-Java-doc)
  *
  * @see javax.servlet.http.HttpServlet#doGet(HttpServletRequest request,
  *      HttpServletResponse response)
  */
 protected void doGet(HttpServletRequest request, HttpServletResponse response) throws ServletException, IOException {
  String filePath = request.getParameter("filePath");
  filePath = new String(filePath.getBytes("8859_1"), "euc-kr");
  System.out.println("--->" + filePath);
 
  File file = new File(filePath);
 
  if(file.exists())
  {
   response.setContentType(this.getMimeType(filePath));
   response.setBufferSize(2048);
   response.setContentLength((int)file.length());
   OutputStream os = response.getOutputStream();
   byte[] buf = new byte[2048];
   InputStream is = new FileInputStream(file);
   int n = -1;
   while((n = is.read(buf)) > 0)
   {
    os.write(buf, 0, n);
   }
   is.close();
   os.flush();
   os.close();
  }
  response.encodeRedirectURL("list?path=" + file.getParent());
 }
 
 public String getMimeType(String fileUrl)
   throws java.io.IOException, MalformedURLException {
  String type = null;
  URL u = new File(fileUrl).toURL();
  URLConnection uc = null;
  uc = u.openConnection();
  type = uc.getContentType();
  return type;
 }

 /*
  * (non-Java-doc)
  *
  * @see javax.servlet.http.HttpServlet#doPost(HttpServletRequest request,
  *      HttpServletResponse response)
  */
 protected void doPost(HttpServletRequest request,
   HttpServletResponse response) throws ServletException, IOException {
  // TODO Auto-generated method stub
 }
}

파일 리스트 출력을 위한 서블릿파일
----------------------------------------------------------
package service.file;

import java.io.IOException;
import javax.servlet.ServletException;
import javax.servlet.http.HttpServletRequest;
import javax.servlet.http.HttpServletResponse;
import java.io.*;
import java.net.*;

/**
 * Servlet implementation class for Servlet: list
 *
 */
public class list extends javax.servlet.http.HttpServlet implements
  javax.servlet.Servlet {
 static final long serialVersionUID = 1L;

 /*
  * (non-Java-doc)
  *
  * @see javax.servlet.http.HttpServlet#HttpServlet()
  */
 public list() {
  super();
 }

 /*
  * (non-Java-doc)
  *
  * @see javax.servlet.http.HttpServlet#doGet(HttpServletRequest request,
  *      HttpServletResponse response)
  */
 protected void doGet(HttpServletRequest request,
   HttpServletResponse response) throws ServletException, IOException {
  String rootDir = (String) request.getParameter("path");
  //rootDir = URLDecoder.decode(rootDir, "utf-8");
  rootDir = new String(rootDir.getBytes("8859_1"), "euc-kr");
  response.setContentType("text/html;charset=euc-kr");
  System.out.println(">" + rootDir);
 
  PrintWriter pw = response.getWriter();

  pw.print("<html><head><title>이것은 서블릿</title></head><body>"
    + "이것은 서블릿 페이지다.!!<br><br>FILE:" + rootDir + "<br><br>");
  File dir = new File(rootDir);
  if (dir.exists() && dir.isDirectory())
  {
   pw.print("<br>");
   for (File file : dir.listFiles())
   {
    if (file.isDirectory())
    {
     pw.print("<a href=list?path=" + URLEncoder.encode(file.getCanonicalPath()
       ,"euc-kr")+ ">" + file.getName() + "</a><br>");
    } else if (file.isFile()) {
     pw.print("<a href=sender?filePath=" + URLEncoder.encode(file.getCanonicalPath()
       ,"euc-kr") + ">" + file.getName() + "</a><br>");
    }
   }
  }
  pw.print("</body></html>");
  pw.flush();
  pw.close();
 }


 /*
  * (non-Java-doc)
  *
  * @see javax.servlet.http.HttpServlet#doPost(HttpServletRequest request,
  *      HttpServletResponse response)
  */
 protected void doPost(HttpServletRequest request,
   HttpServletResponse response) throws ServletException, IOException {
  // TODO Auto-generated method stub
 }
}

'Expired > Java Works' 카테고리의 다른 글

NIO 강좌 - 3  (0) 2008.02.09
NIO 강좌 - 2  (0) 2008.02.09
Java로 EXE 파일 실행..(Excuting exe file by Java Program)  (0) 2007.12.29
실시간 블로그 이미지 갱신..  (0) 2007.12.02
[JMF] JPEG Capture by USB Cam  (0) 2007.11.28

아래의 source는 일반적인 실행파일을 자바프로그램이 실행하는 방법입니다.
.NET Framework상에서 구동되는 프로그램은 일부 동작이 되지 않을수도 있습니다.

-------------------------------------------------------------------------------------------
import java.io.*;

public class Test {
 public static void main(String... v) {
  try {
   String cmd = "D:\\Eclipse_wtp\\KoreanLexer\\res\\moHANA\\moHANA.exe";
   Runtime runtime = Runtime.getRuntime();
   Process prc = runtime.exec("res/EXE/kma.exe");
   System.out.println("Input Thread 가동..");
   new InputStreamFromConsole(prc.getInputStream()).start();  // Console 출력을 java IO로 출력
  } catch (Exception e) {
   e.printStackTrace();
  }
 }
}

// Console 상에 출력되는 message를 출력하기 위한 Thread
class InputStreamFromConsole extends Thread {
 BufferedReader br = null;

 public InputStreamFromConsole(InputStream is) {
   this.br = new BufferedReader(new InputStreamReader(is));
 }

 public void run() {
  String line = "";
  try {
   while ((line = br.readLine()) != null) {
    System.out.println(">" + line);
   }
  } catch (IOException e) {
   e.printStackTrace();
  }
 }
}


[수원 모 오피스텔 실시간 사진]

집에서 놀고 있는 USB 카메라와..
자바 JMF를 이용하여 Webcam for CCTV를 구현하였다.
접속할때 마다 이미지가 갱신된다.
구글맵, 어스와 연동되면 아주 재미있는 서비스가 나올것 같다.

* 현재 AXIS2.0을 이용한 웹서비스 구현중..
* 동영상에 가까운 실시간 갱신도 가능하지만 일단 이건 nio 서버 손좀 봐야 될듯하다..
부하량이 매우크다.. -_-;

자바(Java) JMF를 이용한 USB Cam을 이용한 JPEG 캡쳐

--------------------------------------------------------------------------------------------------
import javax.swing.*;
import javax.swing.event.*;
import java.io.*;

import javax.media.*;
import javax.media.format.*;
import javax.media.util.*;
import javax.media.control.*;
import javax.media.protocol.*;
import java.util.*;
import java.awt.*;
import java.awt.image.*;
import java.awt.event.*;

import com.sun.image.codec.jpeg.*;

public class JPEGCapture {

 public static Player player = null;
 public CaptureDeviceInfo di = null;
 public MediaLocator ml = null;

 public Buffer buf = null;
 public Image img = null;
 public VideoFormat vf = null;
 public BufferToImage btoi = null;

 public JPEGCapture() {
  this.initDevice();
 }

 public void initDevice() {
  String str1 = "vfw:Logitech USB Video Camera:0";
  String str2 = "vfw:Microsoft WDM Image Capture (Win32):0";
  di = CaptureDeviceManager.getDevice(str2);
  ml = di.getLocator();
  try
  {
   player = Manager.createRealizedPlayer(ml);
      player.start();
  }
  catch(Exception e)
  {
   e.printStackTrace();
  }
 }

 public static void playerClose() {
  player.close();
  player.deallocate();
 }

 public void Capture(String absPath) {
  FrameGrabbingControl fgc = (FrameGrabbingControl) player
    .getControl("javax.media.control.FrameGrabbingControl");
  buf = fgc.grabFrame();

  // Convert it to an image
  btoi = new BufferToImage((VideoFormat) buf.getFormat());
  img = btoi.createImage(buf);

  // save image
  saveJPG(img, absPath);
 }

 public static void saveJPG(Image img, String s) {
  BufferedImage bi = new BufferedImage(img.getWidth(null), img
    .getHeight(null), BufferedImage.TYPE_INT_RGB);
  Graphics2D g2 = bi.createGraphics();
  g2.drawImage(img, null, null);

  FileOutputStream out = null;
  try {
   out = new FileOutputStream(s);
  } catch (java.io.FileNotFoundException io) {
   System.out.println("File Not Found");
  }

  JPEGImageEncoder encoder = JPEGCodec.createJPEGEncoder(out);
  JPEGEncodeParam param = encoder.getDefaultJPEGEncodeParam(bi);
  param.setQuality(0.5f, false);
  encoder.setJPEGEncodeParam(param);

  try {
   encoder.encode(bi);
   out.close();
  } catch (java.io.IOException io) {
   System.out.println("IOException");
  }
 }
}
---------------------------------------------------------------------------------------------------

JPEGCapture cap = new JPEGCapture();
cap.Capture("C:\\test.jpg");

위와같이 Capture(String) 메소드를 이용하여 캡쳐파일 생성..

개요
 일반적인 웹서버에 JSP나 Servlet을 실행시키기 위해선 Servlet Container가 필요하다.
대략적인 절차는 아래와 같다.

[클라이언트는 서버에 Request 전송] -> [웹서버가 받는 Request를 객체화]  -> [Servlet Container에 전달하여 Response 객체생성] -> [Response 객체를 웹서버에 전달] -> [웹서버는 Response를 HTTP로 변환, Client에 전송]  

필요한 절차
1. J2SE 설치
2. J2EE 설치
3. Eclipse(이클립스) 설치 : WTP-all-in-one 버전
4. Web Server 설치 : Tomcat
5. Eclipse Runtime 환경 구축
6. Hello World 작성하기

구체적인 절차
1. J2SE 설치
   (생략)

2. J2EE 설치
   (생략)

3. Eclipse 설치 : WTP-all-in-one 버전
 - WTP(Web Tool Platform)는 이클립스상에서 웹개발을 지원하기 위한 프로젝트다.
  해당 홈페이지 : http://www.eclipse.org/webtools/
 - 이클립스에서 원활히 동작하게 하기위해서는 다수의 plugin 설치가 필요하나, 절차가 복작하여 필요한 플러그인을 하나로 모은 WTP-all-in-one 버전이 존재함
  다운로드 http://download.eclipse.org/webtools/downloads/drops/R2.0/R-2.0.1-20070926042742/

사용자 삽입 이미지

 운영체제별 버전이 따로 존재하니 알아서 받자.
 07.11.21 기준 2.x 버전이 최신 버전, 3.x 버전은 존재하나 All-in-one Version은 미출시 상태

4. Web Server 설치 : Tomcat
 가장 보편적으로 사용되는 Tomcat을 설치하자
 해당사이트 : http://tomcat.apache.org/
 6.x 버전 다운로드 : http://mirror.apache-kr.org/tomcat/tomcat-6/v6.0.14/bin/apache-tomcat-6.0.14.zip

5. Eclipse Runtime 환경 구축
  (will be updated..)

6. Hello World 작성하기
 그림 넣고 글몇자 적는거 보다 동영상이 최고의 효과인듯, 보고 따라해보자.
 관련 동영상 http://download.eclipse.org/technology/phoenix/demos/install-wtp/install-wtp.html

소스코드(Source Code)
------------------------------------------------------------------------------------------
import javax.swing.*;
import java.awt.*;
import java.awt.event.*;
import java.awt.image.*;
import java.io.*;
import com.sun.image.codec.jpeg.*;

public class Main extends JPanel implements Runnable, ActionListener{
 
 JButton btn_capture;
 Image img = null;
 
 public Main()
 {
  this.btn_capture = new JButton("영상캡쳐");
  this.btn_capture.addActionListener(this);
  this.setLayout(new BorderLayout());
  this.add(this.btn_capture, BorderLayout.SOUTH);
 }
 
 public void actionPerformed(ActionEvent e)
 {
  String cmd = e.getActionCommand();
  if(cmd.equals("영상캡쳐"))
  {
   System.out.println("영상을 캡쳐합니다..");
   this.capture();
  }
 }
 
 private void drawImage(Image img, int x, int y)
 {
  Graphics g = this.getGraphics();
  g.drawImage(img,0,0,x,y,this);
  this.paint(g);
  this.repaint();
 }
 
 public void paint(Graphics g)
 {
  if(this.img != null)
   g.drawImage(this.img, 0, 0, this.img.getWidth(this), this.img.getHeight(this), this);
 }
 
 public void capture()
 {
  Robot robot;
  BufferedImage bufImage = null;
  try
  {
   robot = new Robot();
   Rectangle area = new Rectangle(Toolkit.getDefaultToolkit().getScreenSize());
   
   bufImage = robot.createScreenCapture(area);
   
   //Graphics2D g2d = bufImage.createGraphics();
   int w = this.getWidth();
   int h = this.getHeight();
   
   this.img = bufImage.getScaledInstance(w, h-20, Image.SCALE_DEFAULT);
   //this.repaint();
   this.drawImage(img, w, h);
   //saveJPEGfile("c:\\cap.jpg", bufImage);
  }
  catch(Exception e)
  {
   e.printStackTrace();
  }
 }
 
 public static boolean saveJPEGfile(String filename, BufferedImage bi)
 {
  FileOutputStream out = null;
  try
    {
     out = new FileOutputStream ( filename );
     JPEGImageEncoder encoder = JPEGCodec.createJPEGEncoder ( out );
     JPEGEncodeParam param = encoder.getDefaultJPEGEncodeParam ( bi );
     param.setQuality ( 1.0f, false );
     encoder.setJPEGEncodeParam ( param );
 
     encoder.encode ( bi );
     out.close();
    }
    catch ( Exception ex )
    {
     System.out.println ("Error saving JPEG : " + ex.getMessage() );
     return false;
    }
  return true;
 }
 
 
 public void run()
 {
  while(true)
  {
   this.setBackground(Color.RED);
   try
   {
    Thread.sleep(1000);
   }catch(Exception e){}
   this.setBackground(Color.GREEN);
   
   try
   {
    Thread.sleep(1000);
   }catch(Exception e){}
  }
 
 }
 
 public static void createFrame()
 {
  JFrame frame = new JFrame("Jv");
  JFrame.setDefaultLookAndFeelDecorated(true);
  Container cont = frame.getContentPane();
  cont.setLayout(new BorderLayout());
  Main mm = new Main();
  //new Thread(mm).start();
  cont.add(mm, BorderLayout.CENTER);
 
  frame.setSize(400, 400);
  frame.setVisible(true);
 }
 
 public static void main(String...v)
 {
  //new Main();
  JFrame.setDefaultLookAndFeelDecorated(true);
  createFrame();
 }
}
------------------------------------------------------------------------------------------------

+ Recent posts